- SurviveJS - Webpack and React
- Introduction
- 1. Webpack Compared
- 2. Developing with Webpack
- 3. Webpack and React
- 4. Implementing a Basic Note App
- 5. React and Flux
- 6. From Notes to Kanban
- 7. Implementing Drag and Drop
- 8. Building Kanban
- 9. Linting in Webpack
- 10. Authoring Libraries
- 11. Styling React
- 12. Troubleshooting
React and Flux
You can get far by keeping everything in components. Eventually that will become painful. Flux application architecture helps to bring clarity to our React applications.
Flux will allow us to separate data and application state from our Views. This helps us to keep them clean and the application maintainable. Flux was designed large teams in mind. As a result, you might find it quite verbose. This comes with great advantages, though, as it can be straightforward to work with.
Introduction to Flux
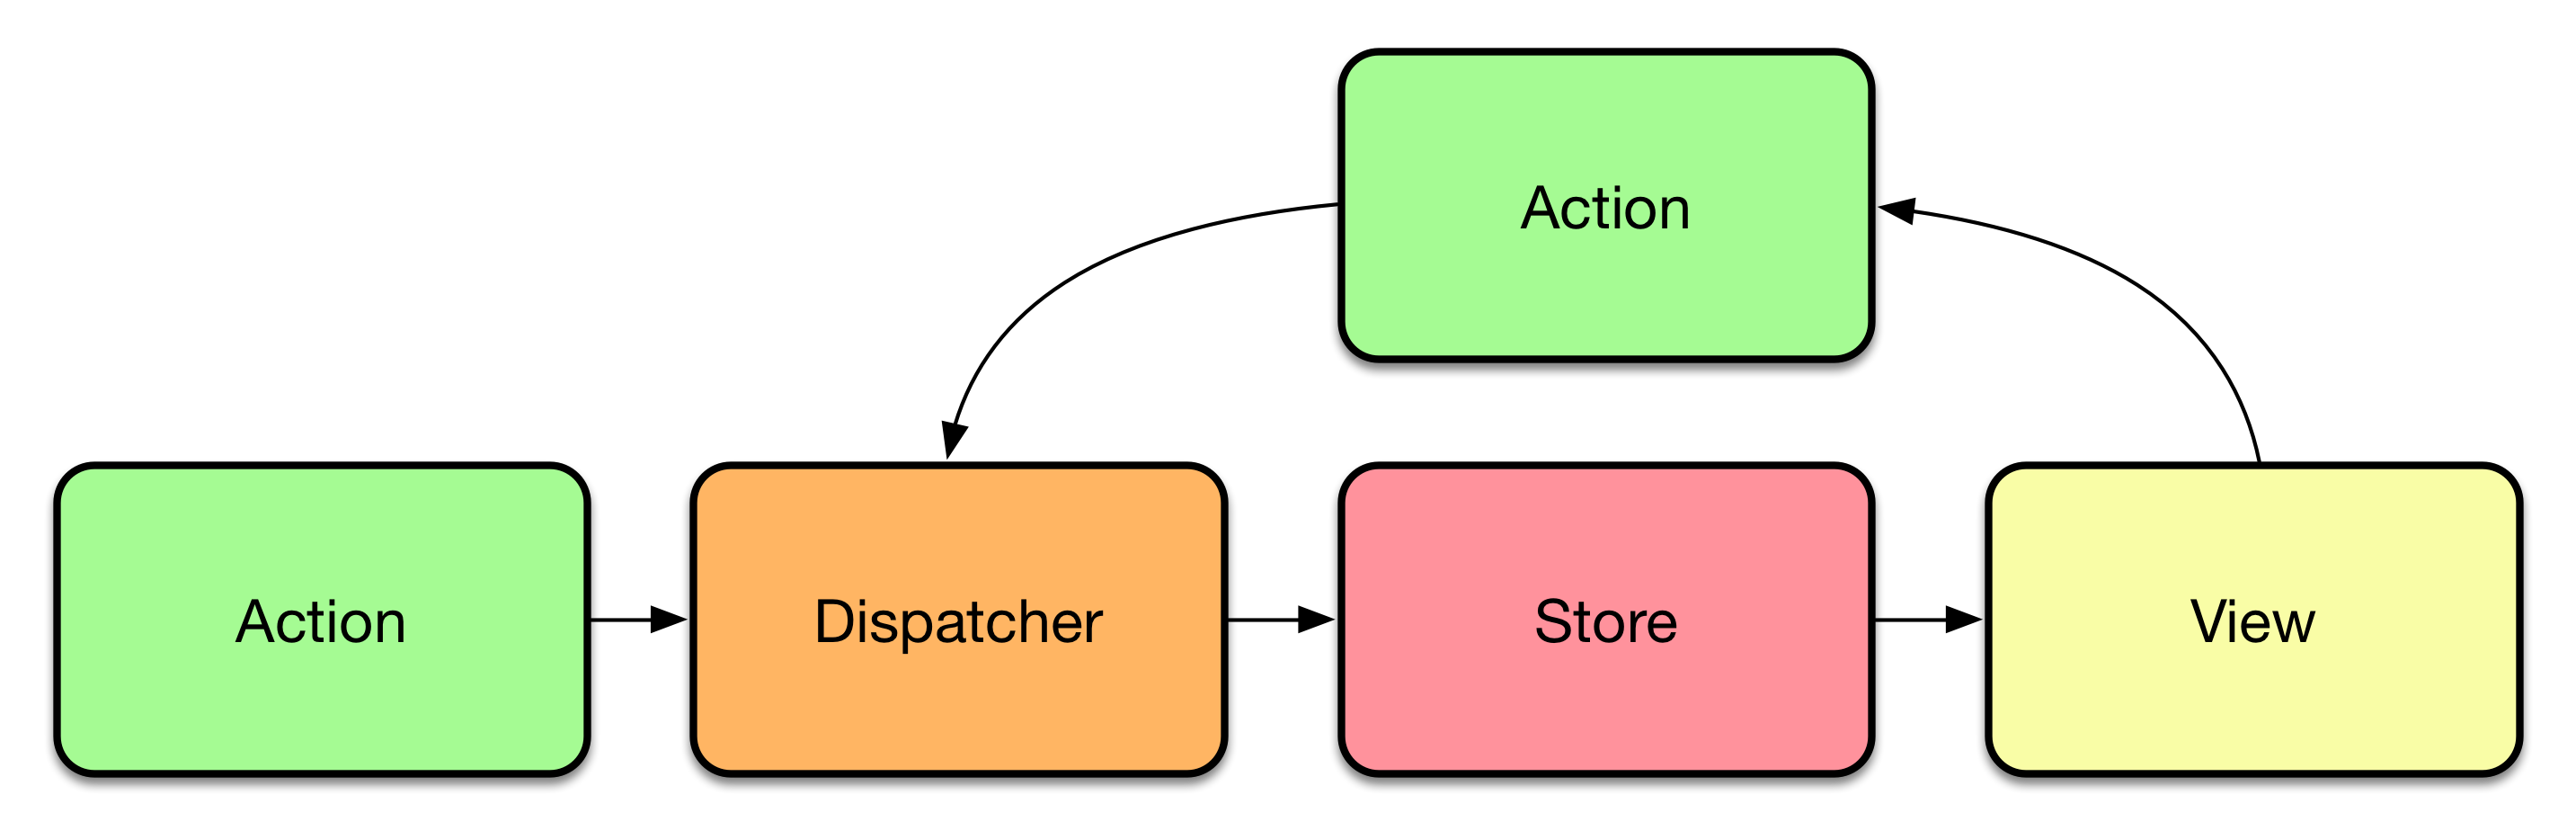
So far we've been dealing only with Views. Flux architecture introduces a couple of new concepts to the mix. These are Actions, Dispatcher and Stores. Flux implements unidirectional flow in contrast to popular frameworks such as Angular or Ember. Even though two-directional bindings can be convenient it comes with a cost. It can be hard to deduce what's going on and why.
Flux isn't entirely simple to understand as there are many concepts to worry about. In our case, we will model NoteActions and NoteModel. NoteActions provide concrete operations we can perform over our data. For instance, we can have NoteActions.create({task: 'Learn React'}).
The action itself doesn't necessarily do much. At simplest level it can tell dispatcher to proceed. Or it could hit a back-end and then trigger dispatcher based on the result. This will allow us to deal asynchronous behavior and possible errors caused by that.
Once the dispatcher has dealt with the action, Stores that are listening to it get triggered. In our case, NoteStore gets notified. As a result, it will be able to update its internal state. After doing this it will notify possible listeners of the new state.
This completes the loop as Views listening to the Stores receive the data. They can use it to update their own state. As a result, the user interface gets refreshed.
This sounds like a lot of steps for achieving something simple as creating a new Note. The approach does come with its benefits. Given the flow goes into a single direction always it is easy to debug. If there's something wrong, it's somewhere within the cycle.
Advantages of Flux
Even though this sounds a little complicated, the arrangement gives our application flexibility. We can, for instance, implement API communication, caching and i18n outside of our Views. This way they stay clean of logic while keeping the application easier to understand.
Implementing Flux architecture in your application will actually increase the amount of code somewhat. It is important to understand, minimizing the amount of code written isn't the goal of Flux. It has been designed to allow productivity across larger teams. You could say explicit is better than implicit.
Which Flux Implementation to Use?
The library situation keeps on changing constantly. There is no single right way to interpret the architecture. You will find implementations fitting for different tastes. voronianski/flux-comparison provides a nice comparison between some of the more popular ones.
When choosing a library it comes down to your own personal preferences. You will have to consider factors such as API, features, documentation and support. Starting with one of the more popular alternatives can be a good idea. As you begin to understand the architecture you are able to make choices that serve you better.
Porting to Alt

In this chapter we'll be using a library known as Alt. It is a flexible, full-featured implementation that has been designed isomorphic rendering in mind.
In Alt you'll deal with Actions and Stores. Dispatcher is hidden, but you will still have access to it if needed. Compared to other implementations Alt hides a lot of boilerplate. There are special features to allow you to save and restore the application state. This is handy for implementing persistency and isomorphic rendering.
Setting Up Alt Instance
Everything in Alt begins from Alt instance. It keeps track of Actions and Stores and keeps communication going on. To get started, let's add Alt to our project:
npm i alt --save
To keep things simple, we'll be treating all Alt components as a singleton. Using the pattern we reuse the same instance within the whole application. To achieve this we can push it to a module of its own and then refer to that from everywhere. Set it up as follows:
app/libs/alt.js
import Alt from 'alt';
//import chromeDebug from 'alt/utils/chromeDebug';

const alt = new Alt();
//chromeDebug(alt);

export default alt;
Webpack caches the modules so the next time you import Alt, will return the same instance again.
T> There is a Chrome plugin known as alt-devtool. After installed you can connect to Alt by uncommenting the related lines above. You can use it to debug the state of your stores, search and travel in time.
Defining CRUD API for Notes
Next, we'll need to define a basic API for operating over the Note data. To keep this simple, let's CRUD (Create, Read, Update, Delete) it. Given Read is implicit, we won't be needing that. We can model the rest as Actions, though. Alt provides a shorthand known as generateActions. We can use it like this:
app/actions/NoteActions.js
import alt from '../libs/alt';

export default alt.generateActions('create', 'update', 'delete');
Defining a Store for Notes
A Store is a single source of truth for a part of your application state. In this case, we need one to maintain the state of the notes. We will connect all the actions we defined above using the bindActions function.
We have the logic we need for our store already at App. Next, we will move that logic to NoteStore.
Setting Up a Skeleton
As a first step we can set up a skeleton for our Store. We can fill in the methods we need after that. Alt uses standard ES6 classes so it's the same syntax as we saw earlier with React components. Here's a starting point:
app/stores/NoteStore.js
import uuid from 'node-uuid';
import alt from '../libs/alt';
import NoteActions from '../actions/NoteActions';

class NoteStore {
  constructor() {
    this.bindActions(NoteActions);

    this.notes = [];
  }
  create(note) {

  }
  update({id, task}) {

  }
  delete(id) {

  }
}

export default alt.createStore(NoteStore, 'NoteStore');
We call bindActions to map each action to a method by name. We trigger the appropriate logic at each method based on that. Finally, we connect the Store with Alt using alt.createStore.
Note that assigning a label to a store (NoteStore in this case) isn't required. It is a good practice as it protects the code against minification and possible collisions. These labels become important when we persist the data.
Implementing create
Compared to the earlier logic create will generate an id for a Note automatically. This is a detail that can be hidden within the store.
import uuid from 'node-uuid';
import alt from '../libs/alt';
import NoteActions from '../actions/NoteActions';

class NoteStore {
  constructor() {
    ...
  }
  create(note) {
    const notes = this.notes;

    note.id = uuid.v4();

    this.setState({
      notes: notes.concat(note)
    });
  }
  ...
}

export default alt.createStore(NoteStore, 'NoteStore');
To keep the implementation clean we are using this.setState. It is a feature of Alt that allows us to signify that we are going to alter the Store state. Alt will signal the change to possible listeners.
Implementing update
update follows the earlier logic apart from some renaming. Most importantly we commit the new state through this.setState:
...

class NoteStore {
  ...
  update({id, task}) {
    let notes = this.notes;
    const noteIndex = this.findNote(id);

    if(noteIndex < 0) {
      return;
    }

    notes[noteIndex].task = task;

    this.setState({notes});
  }
  delete(id) {
    ...
  }
  findNote(id) {
    const notes = this.notes;
    const noteIndex = notes.findIndex((note) => note.id === id);

    if(noteIndex < 0) {
      console.warn('Failed to find note', notes, id);
    }

    return noteIndex;
  }
}

export default alt.createStore(NoteStore, 'NoteStore');
We have one final operation left, delete.
Implementing delete
delete is straightforward. Seek and destroy, as earlier, and remember to commit the change:
...

class NoteStore {
  ...
  delete(id) {
    const notes = this.notes;
    const noteIndex = this.findNote(id);

    if(noteIndex < 0) {
      return;
    }

    this.setState({
      notes: notes.slice(0, noteIndex).concat(notes.slice(noteIndex + 1))
    });
  }
  findNote(id) {
    ...
  }
}

export default alt.createStore(NoteStore, 'NoteStore');
It would be possible to operate directly on data. E.g. a oneliner such as this.notes.splice(targetId, 1) would work for delete. It is recommended that you use setState with Alt to keep things clean and easy to understand.
We have almost integrated Flux to our application now. We have a set of Actions that provide an API for manipulating Notes data. We also have a Store for actual data manipulation. We are missing one final bit - integration with our View. It will have to listen to the Store and be able to trigger Actions to complete the cycle.
T> The current implementation is naive in that it doesn't validate parameters in any way. It would be a very good idea to validate the object shape to avoid incidents during development. Flow based gradual typing provides one way to do this. Alternatively, you could write nice tests. That's a good idea regardless.
Gluing It All Together
Gluing this all together is a little complicated as there are multiple concerns to take care of. Dealing with Actions is going to be easy. For instance, to create a Note, we would need to trigger NoteActions.create({task: 'New task'}). That would cause the associated Store to change and, as a result, all the components listening to it.
Our NoteStore provides two methods in particular that are going to be useful. These are NoteStore.listen and NoteStore.unlisten. They will allow Views to subscribe to the state changes.
As you might remember from the earlier chapters, React provides a set of lifecycle hooks. We can subscribe to NoteStore within our View at componentDidMount and componentWillUnmount. By unsubscribing, we avoid possible memory leaks.
Based on these ideas we can connect App with NoteStore and NoteActions:
app/components/App.jsx
import React from 'react';
import Notes from './Notes.jsx';
import NoteActions from '../actions/NoteActions';
import NoteStore from '../stores/NoteStore';

export default class App extends React.Component {
  constructor(props) {
    super(props);

    this.storeChanged = this.storeChanged.bind(this);
    this.state = NoteStore.getState();
  }
  componentDidMount() {
    NoteStore.listen(this.storeChanged);
  }
  componentWillUnmount() {
    NoteStore.unlisten(this.storeChanged);
  }
  storeChanged(state) {
    this.setState(state);
  }
  render() {
    const notes = this.state.notes;

    return (
      <div>
        <button onClick={this.addNote}>+</button>
        <Notes items={notes}
          onEdit={this.editNote} onDelete={this.deleteNote} />
      </div>
    );
  }
  addNote() {
    NoteActions.create({task: 'New task'});
  }
  editNote(id, task) {
    NoteActions.update({id, task});
  }
  deleteNote(id) {
    NoteActions.delete(id);
  }
}
As we alter NoteStore through actions, this leads to a cascade that causes our App state update through setState. This in turn will cause the component to render. That's Flux unidirectional flow in practice.
We actually have more code now than before, but that's okay. App is a little neater and it's going to be easier to develop as we'll soon see. Most importantly we have managed to implement the Flux architecture for our application.
Dispatching in Alt
Even though you can get far without ever using Flux dispatcher, it can be useful to know something about it. Alt provides two ways to use it. If you want to log everything that goes through your alt instance, you can use a snippet such as alt.dispatcher.register(console.log.bind(console)).
You can use the same mechanism on the Store level. In that case you would trigger this.dispatcher.register(...) at the constructor. These mechanisms allow you to implement effective logging to your system.
What's the Point?
Even though integrating Alt took a lot of effort, it was not all in vain. Consider the following questions:
- Let's say we wanted to persist the notes within
localStorage, where would you implement that? It would be natural to plug that into ourNoteStore. Alternatively we could do something more generic as we'll be doing next. - What if we had many components relying on the data? We would just consume
NoteStoreand display it, however we want. - What if we had many, separate Note lists for different type of tasks? We could set up another Store for tracking these lists. That Store could refer to actual Notes by id. We'll do something like this in the next chapter as we generalize the approach.
This is what makes Flux a strong architecture when used with React. It isn't hard to find answers to questions like these. Even though there is more code, it is easier to reason about. Given we are dealing with a unidirectional flow we have something that is simple to debug and test.
Implementing Persistency over localStorage
We can tweak our implementation of NoteStore to persist the data on change. This way we don't lose our data after a refresh. One way to achieve this is to use localStorage. It is a well supported feature that allows you to persist data to the browser.
Understanding localStorage
localStorage has a sibling known as sessionStorage. sessionStorage loses its data when browser is closed, localStorage doesn't. They both share the same API as discussed below:
storage.getItem(k)- Returns stored stringstorage.removeItem(k)- Removes data matching to keystorage.setItem(k, v)- Stores given value using given keystorage.clear()- Empties storage contents
Note that it is convenient to operate on the API using your browser developer tools. For instance, in Chrome you can see the state of the storages through the Resources tab. Console tab allows you to perform direct operations on the data. You can even use storage.key and storage.key = 'value' shorthands for quick modifications.
localStorage and sessionStorage can use up to 10 MB of data combined. Even though they are well supported, there are certain corner cases with interesting failures. These include running out of memory at Internet Explorer (fails silently) and failing altogether at Safari private mode. It is possible to work around these glitches, though.
T> You can support Safari private mode by trying to write into localStorage first. If that fails, you can use in-memory store instead or just let the user know about the situation. See Stack Overflow for details.
Implementing a Wrapper for localStorage
To keep things simple and manageable, we can implement a little wrapper for storage. It will wrap all of these complexities. The API expects strings. As objects are convenient, we'll use JSON.parse and JSON.stringify for serialization.
It could be a good idea to use a library such as localForage to hide all the complexity. You could even integrate it behind this little interface of ours. We need just storage.get(k) and storage.set(k, v) as seen in the implementation below:
app/libs/storage.js
export default {
  get: function(k) {
    try {
      return JSON.parse(localStorage.getItem(k));
    }
    catch(e) {
      return null;
    }
  },
  set: function(k, v) {
    localStorage.setItem(k, JSON.stringify(v));
  }
};
The implementation could be generalized further. You could convert it into a factory ((storage) => {...}) and make it possible to swap the storage. Now we are stuck with localStorage unless we change the code.
Persisting Application Using FinalStore
Besides this little utility we'll need to adapt our application to use it. Alt provides handy functionality just for this purpose. We can persist the entire state of our application using FinalStore, bootstrapping and snapshotting. FinalStore is a store that listens to all existing stores. Every time some store changes, FinalStore will know about it. This makes it ideal for persistency.
We can take a snapshot of the entire app state and push it to localStorage every time FinalStore changes. That solves one part of the problem. Bootstrapping solves the remaining part as alt.bootstrap allows us to set state of the all stores. In our case, we'll fetch the data from localStorage and invoke it to populate our stores. This is handy for other cases as well. The data can come from elsewhere, through a WebSocket for instance.
T> An alternative way would be to take a snapshot only when the window gets closed. There's a Window level beforeunload hook that could be used. The problem with this approach is that it is brittle. What if something unexpected happens and the hook doesn't get triggered for some reason? You'll lose data.
In order to integrate this idea to our application we will need to implement a little module to manage it. There we take possible initial data in count and trigger the new logic.
app/libs/persist.js does the hard part. It will set up a FinalStore, deal with bootstrapping (restore data) and snapshotting (save data). I have included an escape hatch in form of debug flag. If it is set, the data won't get saved to localStorage. The reasoning is that doing this you can set the flag (localStorage.setItem('debug', 'true')), hit localStorage.clear() and refresh the browser to get a clean slate. The implementation below illustrates these ideas:
app/libs/persist.js
import makeFinalStore from 'alt/utils/makeFinalStore';

export default function(alt, storage, storeName) {
  const finalStore = makeFinalStore(alt);

  alt.bootstrap(storage.get(storeName));

  finalStore.listen(() => {
    if(!storage.get('debug')) {
      storage.set(storeName, alt.takeSnapshot());
    }
  });
}
To make our NoteStore aware of possibly existing data, we'll need to tweak our constructor to take it in count. The data might not exist already, though, so we'll still need a default.
app/stores/NoteStore.js
...

class NoteStore {
  constructor() {
    this.bindActions(NoteActions);

    this.notes = this.notes || [];
  }
  ...
}

export default alt.createStore(NoteStore, 'NoteStore');
Finally, we need to trigger persistency logic at initialization. We will need to pass relevant data to it (Alt instance, storage, storage name) and off we go.
app/main.jsx
...
import alt from './libs/alt';
import storage from './libs/storage';
import persist from './libs/persist';

main();

function main() {
  persist(alt, storage, 'app');

  ...
}
If you try refreshing the browser now, the application should retain its state. The solution should scale with minimal effort if we add more stores to the system. Integrating a real back-end wouldn't be a problem. There are hooks in place for that now.
You could, for instance, pass the initial payload as a part of your HTML (isomorphic rendering), load it up and then persist the data to the back-end. You have a great deal of control over how to do this and you can use localStorage as a backup if you want.
W> Our persist implementation isn't without its flaws. It is easy to end up in a situation where localStorage contains invalid data due to changes made to the data model. This brings you to the world of database schemas and migrations. There are no easy solutions. Regardless this is something to keep in mind when developing something more sophisticated. The lesson here is that the more you inject state to your application, the more complicated it gets.
Extracting Connection Decorator

Even though the application is starting to look a little better now, there's still work to be done. For instance, App contains plenty of store connection related logic. This isn't nice. We should extract that so it's easier to manage.
One way to achieve this is to push the logic to a decorator. Decorators are a bit like matryoshkas. These Russian dolls can contain dolls inside them. We can achieve the same with decorators.
What Are Decorators?
If you have used languages such as Java or Python before, you might be familiar with the concept. They are syntactical sugar that allow us to wrap classes and functions. In short, they provide us a way to annotate and push logic elsewhere. This allows us to keep our components simple to read. There is a stage 1 decorator proposal for JavaScript.
By definition a decorator is a function that returns a function. In the case of our connection decorator we could end up with connect(NoteStore)(App). In decorator syntax the same would be @connect(NoteStore) right before App class declaration.
Implementing @connect
@connect will wrap our component in another component. That in turn will deal with the connection logic (listen/unlisten/setState). It will maintain the store state internally and then pass it to the child component we are wrapping. During this process it will pass the state through props. The implementation below illustrates the idea:
app/decorators/connect.js
import React from 'react';

const connect = (Component, store) => {
  return class Connect extends React.Component {
    constructor(props) {
      super(props);

      this.storeChanged = this.storeChanged.bind(this);
      this.state = store.getState();

      store.listen(this.storeChanged);
    }
    componentWillUnmount() {
      store.unlisten(this.storeChanged);
    }
    storeChanged() {
      this.setState(store.getState());
    }
    render() {
      return <Component {...this.props} {...this.state} />;
    }
  };
};

export default (store) => {
  return (target) => connect(target, store);
};
I have separated the higher order portion and decorator wrapping for clarity. It would be possible to perform both steps in the same function, but I find it more readable this way. Can you see the wrapping idea? Our decorator tracks store state. After that it passes the state to the component contained through props.
T> ... is known as ES7 rest spread operator. It expands the given object to separate key-value pairs, or props, as in this case.
You can connect our new decorator with App like this:
app/components/App.jsx
...
import connect from '../decorators/connect';

...

@connect(NoteStore)
export default class App extends React.Component {
  render() {
    const notes = this.props.notes;

    ...
  }
  ...
}
Note how much code this simple decorator removes from our App. If we wanted to add more stores to the system and connect them to components, it would be trivial now. Even better we could connect multiple stores to a single component easily.
Decorator Ideas
We can build new decorators for various functionalities, such as undo, in this manner. They allow us to keep our components tidy and push common logic elsewhere out of sight. Well designed decorators can be used across projects.
Alt's @connectToStores
Alt provides a similar decorator known as @connectToStores. It relies on static methods. This a ES6 feature and you might be familiar with it from other languages. Rather than normal methods that are bound to a specific instance, these are bound on class level. This means you can call them through the class itself (i.e. App.getStores()). The example below shows how we might integrate @connectToStores into our application.
...
import connectToStores from 'alt/utils/connectToStores';

@connectToStores
export default class App extends React.Component {
  static getStores(props) {
    return [NoteStore];
  }
  static getPropsFromStores(props) {
    return NoteStore.getState();
  }
  ...
}
This more verbose approach is roughly equivalent to our implementation. It actually does more as it allows you to connect to multiple stores at once. It also provides more control over the way you can shape store state to props.
To get familiar with more approaches we'll be using AltContainer in this project. Using the decorator is completely acceptable. It comes down to your personal preferences.
Using AltContainer Instead of a Decorator
AltContainer wrapper that does the same thing and a bit more. It provides a greater degree of customizability than our own solution. It's officially supported by Alt protecting us from possible API changes.
You will see the wrapper pattern later again in this book and you will learn to implement it yourself. In this case, the pattern will allow us to set up arbitrary connections to multiple stores. Besides, we have control over how to inject them to the contained components. Particularly this fact will become important as we grow the application.
The implementation below illustrates how to bind it all together. We'll drop @connect from the project altogether and expand render() to use AltContainer. After these changes we are good to go.
app/components/App.jsx
import AltContainer from 'alt/AltContainer';
import React from 'react';
import Notes from './Notes.jsx';
import NoteActions from '../actions/NoteActions';
import NoteStore from '../stores/NoteStore';

export default class App extends React.Component {
  render() {
    return (
      <div>
        <button onClick={this.addNote}>+</button>
        <AltContainer
          stores={[NoteStore]}
          inject={ {
            items: () => NoteStore.getState().notes
          } }
        >
          <Notes onEdit={this.editNote} onDelete={this.deleteNote} />
        </AltContainer>
      </div>
    );
  }
  ...
}
Integrating AltContainer actually grew our component a little bit. It also tied this component to Alt. If you wanted something forward-looking, you could push it into a component of your own. That facade would hide Alt and allow you to replace it with something else later on.
Relay?
Facebook's Relay is an interesting alternative to Flux. It improves on the data fetching department. It allows you to push data requirements to the View level.
Given it's still untested technology we won't be covering it in this book yet. Relay comes with its special requirements of its own (GraphQL compatible API). Only time will tell how it gets adopted.
Conclusion
In this chapter you saw how to port our simple application to use Flux architecture. In the process we learned about basic concepts of Flux. We also learned to extract logic into decorators. Now we are ready to start adding more functionality to our application.